Windows Home Server 2011 – Backup Plan

As part of my Windows Home Server 2011 Custom Build (Part1 and Part2), I wrote about what the hardware looks like and how I set up my drives.  In the last part of this series I’ll cover the Backup and Restore strategy. 

While I like remote access, the main reason I actually got a WHS was to ensure that my data stays safe no matter what.  Lost data is the kind of horror that can break up a marriage (especially true with our first baby now part of the family).  I wanted something that gave me piece of mind, wouldn’t require me spending an entire weekend to recover everything if things went south, and preferably added a few other bells and whistles to make digital life even better. 

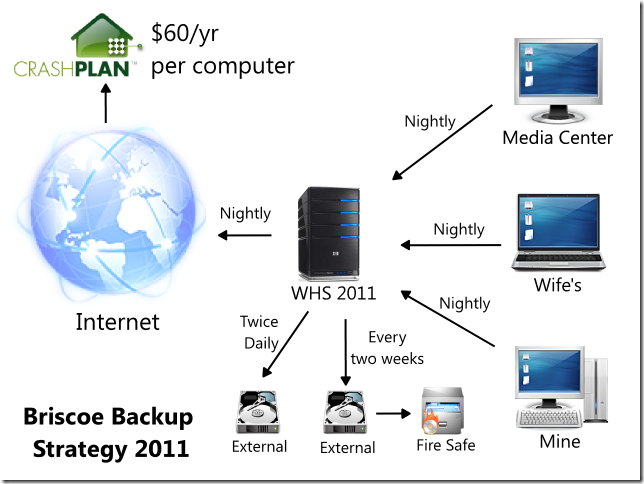
Like any good backup strategy, I want to cover as many different disaster scenarios applying the right solution to each problem. 

BriscoeBackupStrategy2011

So each computer in the house backs up to WHS which makes it easy to restore the computer in case of a hardware crash.  My WHS includes RAID to help with hardware failure,  However, I’m also backing up to external USB drives, twice daily just in case so that it’s easier to restore WHS 2011.  Then nightly, the entire WHS is backed up to the cloud using CrashPlan to handle serious disasters like a fire (or more recently tornados).  The fire safe backup is kind of a legacy thing, but I’m thinking with the cloud based backup that I don’t need to back up to the fire safe anymore.  What do you think?

A quick note on the cloud backup.  I really wanted to use something like KeepVault or CloudBerry backup because they offer native WHS 2011 plug-ins which I think is a nice feature.  However, the price point compared to CrashPlan just didn’t work out.  I’m hopeful that CrashPlan starts officially supporting WHS 2011 and offers a plug-in in the near future.  I will also only be backing up really important stuff like pictures to help keep my storage down.  CrashPlan has unlimited storage so that’s more to conserve bandwidth.  Plus, in the event of a complete disaster like my house is taken to Oz then I won’t be that concerned with stuff I can replace like my movies.

Let me know what you think and if there’s a better way I can do this.  Until I hear something better, the strategy I outlined is what I’m sticking with and I’ll post an update when disaster strikes.

In addition to blogging, I’m also using Twitter for quick updates.  @seanbriscoe.
Windows Home Server 2011 – My Custom Build (Part 2)

Now that I’ve got the hardware for my build, let’s look at what I actually did with it.  As you may recall, the main reason I went with a custom build was for the RAID so let’s start there first.

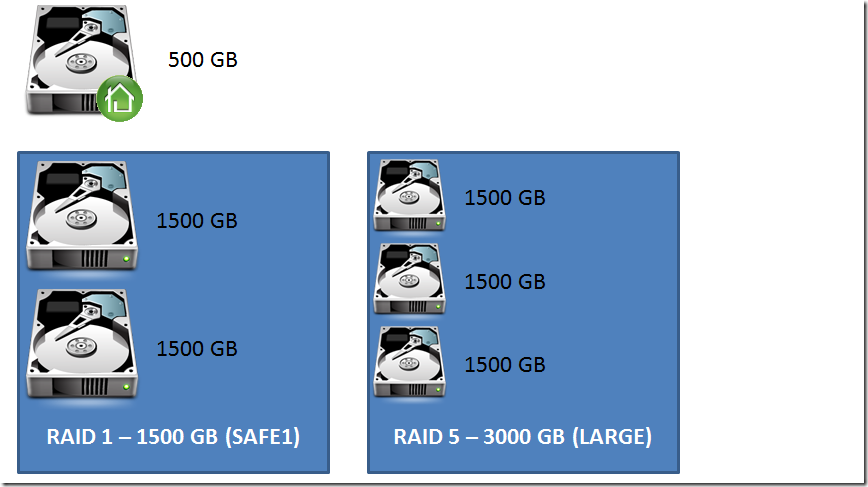
After taking out the drives in my old MediaSmart, here’s what my hard drive configuration looks like:

image

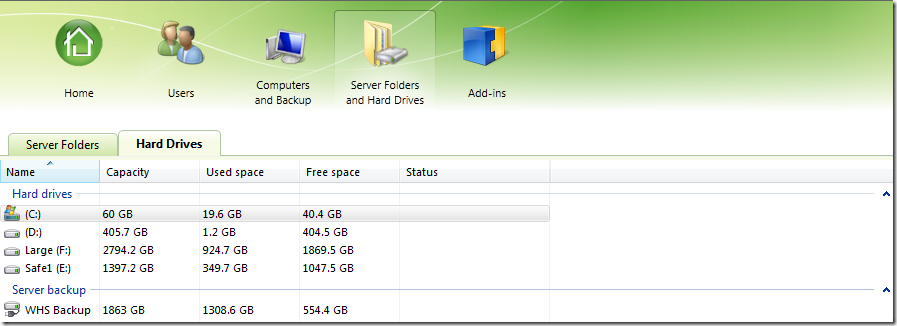
From the WHS Dashboard, you can see the the drives:

image

* Note that WHS 2011 creates a 60 GB C: partition for the OS.

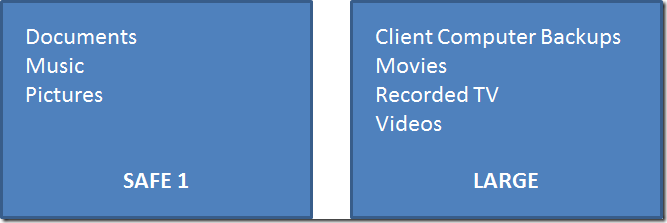
And I’ve arranged the folders:

image

I didn’t mirror the OS drive simply because I didn’t have a second matching drive and didn’t want to buy any more drives than I already had.  In retrospect, I wish I’d just bought a 1.5 TB drive and used one of my existing ones to mirror as the 500 GB drive is kind of a waste.  When this drive crashes, I’ll buy two new drives and mirror them (and test out the restore process while I’m at it).

I have the Documents, Music and Pictures on the RAID1 drive for safety and the 1.5 TB’s will be plenty of space for these three things even long term.  The RAID5 drive I’m using for stuff I don’t care about quite as much and that is likely to take up a lot of space.

As you can see from the WHS Dashboard image, I am backing up to an external USB drive.  I should say supposed to be backing up to it because right now it fails pretty regularly (a separate post on that in due time).  I’ve also got another external USB drive that I’ll put in the fire safe.  Lastly, I plan on adding a cloud based back-up solution (Cloudberry is the forerunner right now).  Once I have my backup / restore plan in place and tested, I’ll do a follow-up post on that.

* Hard drive images are from the Crystal Clear set of icons.

Windows Home Server 2011 – My Custom Build

I was previously a big fan of Windows Home Server (v1) and had purchased HP’s MediaSmart server.  This served me and my family well until the OS drive failed.  I replaced the drive and reinstalled the OS using the appropriate CD’s from HP.  Thankfully I didn’t lose any data (that’s the point of WHS after all), but remote access never worked for me again.  Given that I have a lot of geographically distributed family that used the server, a non-working remote access is a serious problem.

About this time, WHS 2011 went RTM so I thought it was the perfect time to go for an upgrade.  Unfortunately, a software upgrade wasn’t really an option from Microsoft (even more so since HP has dropped future WHS hardware).  I thenI looked at re-purposing the MediaSmart hardware and doing my own installation.  The first hurdle is that the MediaSmart server I have is 32-bit and WHS 2011 is a 64-bit only OS.  I considered upgrading some of the internals, but ultimately decided against it because Drive Extender was dropped from WHS.  DE’s removal from WHS 2011 caused a lot of angst and gnashing of teeth among enthusiasts, but I’ll save my thoughts on that for another post.

The point is that Drive Extender created a pool of storage that enabled an easy approach to redundancy (mirror) and different size drives that will definitely be missed.  Now that it’s gone, I needed an alternative…enter RAID.  Since my MediaSmart server didn’t support RAID, I figured it was time to build a new server.  More important than form factor, I wanted something cheap.  I’ve already got a big desktop and another tower server, so one more wasn’t that big of a deal.

Here’s the hardware I ended up with (all from Newegg along with the pictures):

Qty Product

Price

1 G.SKILL Ripjaws Series 4GB (2 x 2GB) 240-Pin DDR3 SDRAM DDR3 1600 (PC3 12800) Desktop Memory Model F3-12800CL9D-4GBRL
G.SKILL Ripjaws Series 4GB (2 x 2GB) 240-Pin DDR3 SDRAM DDR3 1600 (PC3 12800) Desktop Memory

$49.99

2 3ware CBL-SFF8087OCF-05M 1 unit of 0.5m Multi-lane Internal (SFF-8087) Serial ATA breakout cable, forward
3ware CBL-SFF8087OCF-05M 1 unit of 0.5m Multi-lane Internal (SFF-8087) Serial ATA breakout cable, forward

$39.98
($19.99 ea)

1 Antec earthwatts EA500 500W Continuous Power ATX12V v2.2 80 PLUS Certified Active PFC “Compatible with Core i7/Core i5” …
Antec earthwatts EA500 500W Continuous Power

$69.99

1 SAMSUNG Spinpoint F3 HD502HJ 500GB 7200 RPM SATA 3.0Gb/s 3.5″ Internal Hard Drive -Bare DriveSAMSUNG Spinpoint F3 500GB 3.5

$49.99

1 GIGABYTE GA-H55M-USB3 LGA 1156 Intel H55 HDMI USB 3.0 Micro ATX Intel MotherboardGIGABYTE GA-H55M-USB3 Micro ATX Intel Motherboard

$109.99

1 Intel Core i3-540 Clarkdale 3.06GHz LGA 1156 73W Dual-Core Desktop Processor BX80616I3540Intel Core i3-540 3.06GHz LGA 1156 73W Dual-Core Desktop Processor

$119.99

1 HighPoint RocketRAID 2680 SGL PCI-Express x4 SATA / SAS (Serial Attached SCSI) Controller CardHighPoint RocketRAID 2680 SGL PCI-Express x4 SATA / SAS (Serial Attached SCSI) Controller Card

$99.99

1 Antec Three Hundred Black Steel ATX Mid Tower Computer CaseAntec Three Hundred Black Computer Case

$59.95

  Subtotal $599.87
  Shipping $18.53
  Total $618.40

I plan on using the hard drives from my existing WHS which is why you don’t see more space here.  The form factor sucks compared to the MediaSmart or Tranquil PC’s Leo HS4, but it’s got room for the future.  Plus, the major reason I went with a custom build is to incorporate RAID while still keeping it pretty cheap.  This price point is about the same as the MediaSmart and less than the Leo, so I hit my goal.

In a later post, I’ll detail out what I did with the hardware in terms of how I set up my shares.